Essential Pottery Tools for Beginners: What You Actually Need to Start
When I first got serious about pottery, I made a classic beginner mistake – I went to the pottery supply store and bought everything that looked remotely useful. I walked out with a bag full of specialty tools, fancy ribs, and various implements whose purpose I couldn't even explain. I spent over $150 on tools, and you know what? I still use maybe $30 worth of them regularly.
Here's the truth about pottery tools that nobody tells beginners: you need surprisingly little to create beautiful pottery. Most pottery studios provide everything you need for classes – including pottery wheels, kilns, and all the heavy equipment. When you're ready to build your own toolkit, a handful of basic tools will cover 95% of your pottery work.
Let me save you some money and confusion by walking through what pottery tools you actually need as a beginner, what can wait, and what you can skip entirely.
The Golden Rule: Don't Buy Anything Yet
Seriously. If you're just starting pottery classes, don't rush out to buy tools. Your pottery studio will provide everything you need, and you'll quickly discover which tools you actually reach for and which ones just take up space.
I wish someone had told me this before I bought that expensive tool kit. After six months of pottery classes, I realized I barely touched half of those tools. The ones I used constantly were the simplest, most basic implements – some of which I could have improvised from household items.
Use studio tools for at least a few months. Pay attention to which ones you use every session and which ones you never touch. Then, when you're ready to build your own collection, you'll make informed choices based on your actual pottery practice rather than what looked cool in the catalog.
The Absolute Essentials (What You'll Actually Use)
Wire Cut-Off Tool ($5-10)
This is probably the most essential pottery tool you'll own. It's literally just a wire with two handles, used to cut clay and remove finished pieces from the pottery wheel or work surface.
I use mine every single pottery session, multiple times. It cuts through clay cleanly, removes wheel-thrown pieces without distorting them, and can slice a block of clay into workable chunks. Some potters use fishing line or dental floss instead, which works fine, but a proper wire tool with comfortable handles is worth the few dollars.
What to look for: Twisted wire is stronger than single strand. Wooden handles are more comfortable than plastic. That's it – don't overthink this one.
Wooden Rib or Kidney ($3-10)
Ribs are curved tools used for smoothing clay surfaces, shaping pottery walls, and compressing clay. They come in various materials – wood, rubber, metal, plastic – but I reach for my wooden rib most often.
On the pottery wheel, I use it to smooth the exterior of bowls and cylinders, compress bases to prevent cracking, and refine curves. For hand building, it's perfect for smoothing coil joints and creating even surfaces.
I have about six different ribs now (see what I mean about accumulating tools?), but honestly, one medium-sized wooden rib would have been enough when I started. The different shapes and materials have subtle advantages, but they're not necessary for beginners.
What to look for: Medium size with gentle curves on both edges. Wood is versatile and feels good in your hand. Avoid the super-fancy expensive ones initially.
Sponge ($3-6)
A sponge is essential for pottery wheel work and useful for hand building. You'll use it constantly to manage water on the wheel, smooth surfaces, and clean up clay edges.
You can use either synthetic or natural sponges. Both work well for pottery. Natural sponges tend to hold more water and some potters prefer the feel, but synthetic sponges work perfectly fine and are often cheaper. Choose whatever fits your budget and preference.
Sponges are consumable items, not lifetime investments, but they're cheap enough that it doesn't matter.
What to look for: Medium-sized sponge (natural or synthetic). Not too big (harder to control) or too small (holds less water). That's literally all the thought you need to put into this.
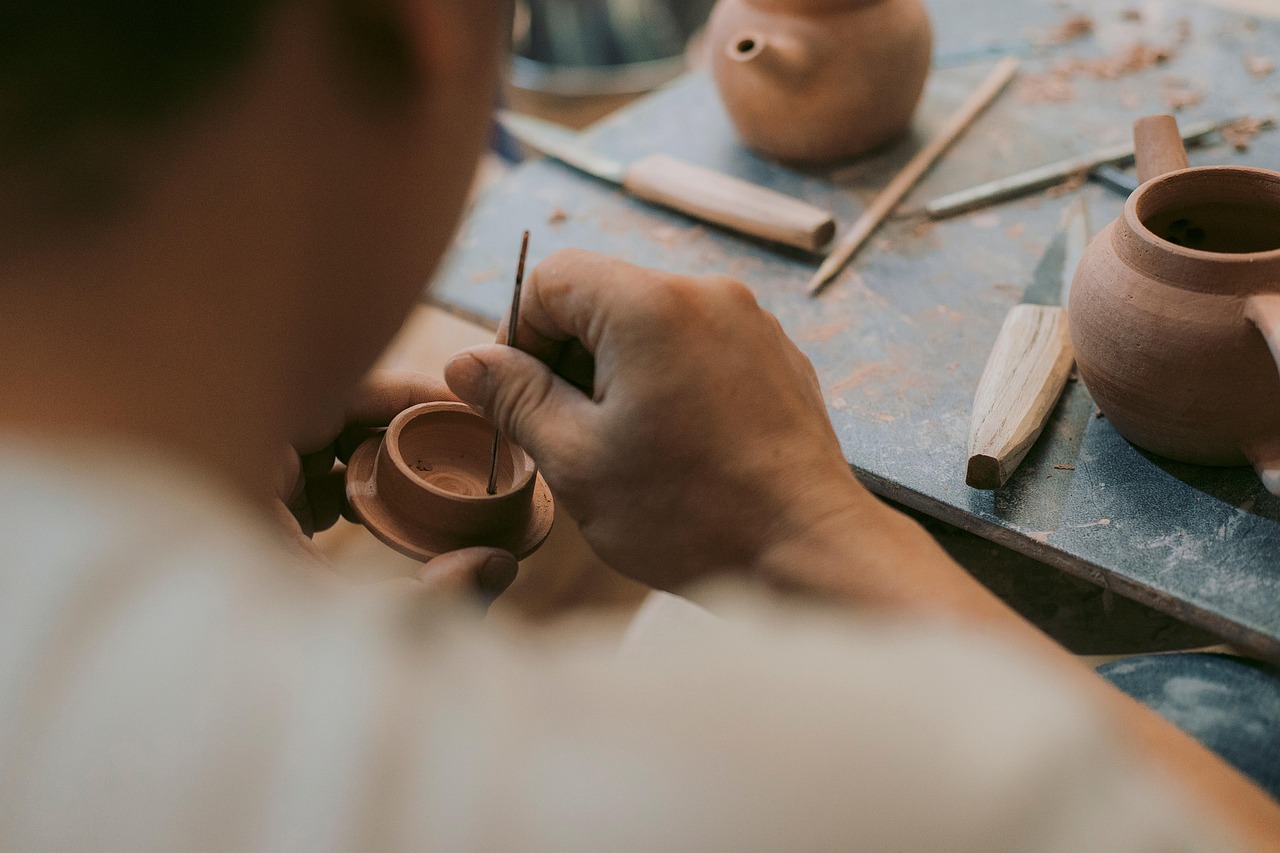
Needle Tool ($4-8)
A needle tool is basically a sharp needle mounted in a handle. Simple, but incredibly useful. I use mine for:
- Trimming uneven rims on wheel-thrown pottery
- Poking air holes to prevent explosions during firing
- Scoring clay surfaces before joining pieces
- Creating detailed decorative lines
- Checking wall thickness by piercing the clay
You could technically use a pin or needle, but having it securely mounted in a handle makes it much safer and easier to control. This is one of those tools that costs almost nothing but gets used constantly.
What to look for: Comfortable handle, securely attached needle. Some have retractable needles for safety, which is nice but not essential.
Simple Trimming Tool ($5-10)
For wheel throwing, you'll need at least one basic trimming tool. These are used to refine the bottom and walls of leather-hard pottery, creating foot rings and cleaning up excess clay.
Trimming tools come in dozens of shapes and sizes, which is overwhelming for beginners. Start with one basic loop tool (for larger pieces) or a smaller loop tool (for detailed work) – medium size, comfortable handle. As you develop preferences, you can add specialized shapes, but one versatile trimming tool will handle most beginner pottery needs.
I now own probably eight different trimming tools, but I use the same basic loop tool for 80% of my trimming work. All those specialty shapes? Mostly collecting dust.
What to look for: Comfortable wooden handle, securely attached metal loop. Medium size (neither the tiniest nor the largest). That's it.
The "Nice to Have" Category (Wait a Few Months)
Wooden Modeling Tools ($6-15 for a set)
These modeling tools are useful for hand building, adding texture, and detailed surface work, but they're not essential initially. I bought a set early on and didn't touch them for months because I was focused on basic wheel throwing.
When I started doing more hand building and surface decoration, these became more useful. But if you're just learning basic pottery techniques, you can absolutely wait on these.
Household alternatives: Butter knives, forks, wooden skewers, and chopsticks can all do similar jobs until you're ready to invest in proper modeling tools.
Metal Ribs ($10-20)
Metal ribs are great for creating super smooth surfaces on wheel-thrown pottery and compressing clay effectively. But wooden ribs do 90% of what metal ribs do, just slightly less perfectly.
I love my metal rib now, but I didn't need it as a beginner. If your studio has metal ribs available, try them before buying. Some potters prefer them, others find wooden ribs sufficient.
Rubber Ribs ($10-20)
If you're ready to step up your rib game, rubber ribs from Mudtools are excellent for ultimate control and versatility. They offer a unique feel that's different from both wooden and metal ribs – more flexible than metal but with better control than basic wooden ribs.
Rubber ribs are especially nice when you're working on pieces that need precise shaping and you want that extra level of control. They're not essential, but once you've been throwing for a while and want to refine your technique, a good rubber rib can make a noticeable difference in your control and the smoothness of your surfaces. The soft, flexible polymer material bends into tight spaces and allows for incredibly smooth surfaces that are hard to achieve with other rib types.
Fettling Knife ($6-12)
A fettling knife is specifically designed for pottery – it has a flexible blade that's perfect for cutting clay, trimming edges, and cleaning up joints. It's genuinely useful, but honestly? A butter knife from your kitchen does almost the same thing.
I eventually bought a proper fettling knife because I was at the pottery supply store anyway, but I used kitchen knives for my first six months of pottery with no problems.
Calipers ($8-20)
Calipers measure the diameter of pottery pieces, which is crucial if you're making lids or sets of matching pieces. For a beginner making random bowls and mugs, you don't need them.
When I started making teapots with fitted lids, calipers became essential. Before that, they sat in my tool bag unused. Wait until you have a specific need for precise measurements.
Finishing Sponge ($8-15)
A finishing sponge, like the Mudtools finishing sponge, is a specialty sponge designed for creating super smooth, polished surfaces on your pottery. While your regular sponge handles most water management and basic smoothing, a finishing sponge gives you that extra level of refinement.
I didn't think I needed one until I started wanting perfectly smooth surfaces on my wheel-thrown pieces. Regular sponges work fine, but a finishing sponge removes those last tiny imperfections and creates a truly professional finish. They're especially nice for pieces where you want a clean, refined look rather than the organic texture of hand-finished clay.
If you're still learning the basics, you can absolutely skip this. But once you're consistently creating pieces you're proud of and want to elevate the finish quality, a finishing sponge is a worthwhile addition.
What to look for: Mudtools makes excellent finishing sponges that are specifically designed for this purpose. They're denser than regular sponges and have a finer texture that polishes clay surfaces beautifully.
Tools You Can Probably Skip (At Least Initially)
Expensive Tool Sets
Pottery supply stores love selling beginners complete tool sets with 15-20+ tools for $50-100+. These expensive sets often include specialty tools you'll rarely touch, and you'll end up using maybe five of those tools regularly. The rest will sit in your bag making you feel guilty about the money you spent.
However, affordable basic tool kits are actually a great option for beginners! If you're ready to build your own toolkit, a simple, budget-friendly kit can be a smart purchase. Look for kits in the $10-20 range that include the essentials: wire tool, rib, sponge, needle tool, and trimming tool.
For wheel throwers, a basic 8-piece pottery tool kit covers all the essentials you'll use constantly. If you're interested in hand building or sculpting, an 18-piece kit with extra sculpting tools gives you more versatility for just a bit more money.
These affordable kits are perfect for beginners because they include exactly what you need without all the expensive specialty tools that will gather dust. You can always add individual tools later if you discover specific needs.
The key is avoiding the expensive $50-100+ sets that try to include everything. Stick with basic, affordable kits or build your collection gradually by buying individual tools based on what you actually need.
Specialty Trimming Tools
There are trimming tools shaped like teardrops, squares, triangles, and various other geometric forms. Each supposedly has a specific purpose. In reality, most potters have one or two favorites and ignore the rest.
Don't buy the complete trimming tool set. Get one basic loop tool and add others only if you discover a specific need.
Decorative Stamps and Texture Tools
These decorative stamps and texture tools are fun and can create beautiful surface decoration, but they're definitely not essential for beginners learning basic pottery techniques.
Plus, you can create interesting textures with household items – lace, buttons, shells, leaves, rubber stamps, and countless other objects can impress patterns into clay. I've made some of my favorite textures using items from my kitchen and garden. Texture rollers are another option if you want to create consistent patterns.
If you eventually want to invest in decorative tools, wait until you've developed a sense of what aesthetic you're drawn to. Those expensive stamp sets aren't useful if they don't match your personal style.
Banding Wheel (For Now)
A banding wheel is like a lazy susan for pottery – it rotates so you can work on all sides of a piece without picking it up. They're genuinely useful, especially for hand building and decorating, but not essential when you're starting out.
Most pottery studios have banding wheels available. Use the studio ones until you're working at home regularly, then consider buying one. They're not expensive (basic ones are $20-40), but why buy something before you know you need it?
Improvising Pottery Tools from Household Items
Some of my most-used "tools" aren't pottery tools at all:
Credit cards or hotel key cards: Perfect for smoothing surfaces and creating crisp edges on slab-built pottery. Free, flexible, and disposable when they get too clay-covered.
Butter knives: Excellent for cutting slabs, scoring surfaces, and general clay manipulation. I still use these alongside my "proper" pottery tools.
Forks: Great for scoring clay surfaces before joining. The tines create perfect texture for slip to adhere to.
Chopsticks or wooden skewers: Useful for creating holes, adding texture, or supporting hollow forms while they dry.
Plastic containers: Save yogurt containers, takeout containers, and other plastic vessels for storing tools, holding water, or mixing slip.
Old towels: Essential for cleanup. Pottery is messy, and you'll go through towels quickly. Use old ones you don't mind staining with clay.
The pottery police won't arrest you for using improvised tools. If something works, it works. Traditional pottery techniques used whatever tools were available, and you can too.
When to Upgrade Your Pottery Tools
You'll know it's time to invest in better tools when:
You're using studio tools constantly: If you're at the studio multiple times per week and always reaching for the same tools, it might be time to buy your own.
You want to practice at home: If you're setting up a home pottery space, you'll need your own basic toolkit. But even then, start minimal and add tools as needed.
A tool breaks or wears out: If you've been using improvised tools and one stops working well, that's a signal to invest in the proper version.
You have a specific need: Maybe you're making a series of lidded jars and need calipers for consistency. Or you're doing detailed surface decoration and want proper modeling tools. Buy tools to solve specific problems.
You're genuinely frustrated by tool limitations: If you find yourself thinking "this would be easier with [specific tool]," and that thought persists over multiple pottery sessions, it's probably time to buy that tool.
Building Your First Pottery Tool Kit
When you're ready to assemble your own basic toolkit, you have two great options:
Option 1: Buy an Affordable Basic Kit
The easiest way to get started is with a simple, budget-friendly tool kit. These kits include all the essentials you'll use constantly, and they're surprisingly affordable.
For wheel throwers: An 8-piece pottery tool kit gives you everything you need for wheel throwing – wire tool, ribs, sponge, needle tool, trimming tools, and more. This kit focuses on the tools you'll use most often on the wheel.
For hand builders or those wanting more versatility: An 18-piece kit with extra sculpting tools includes all the wheel throwing essentials plus modeling tools, extra ribs, and sculpting implements. This is perfect if you're exploring hand building or want more creative options.
Both kits are affordable (under $30) and include exactly what beginners need without the expensive specialty tools you'll never touch.
Option 2: Buy Tools Individually
If you prefer to build your toolkit piece by piece, here's what I'd recommend:
Absolute essentials ($25-40 total):
- Wire cut-off tool
- One wooden rib
- Sponge (synthetic or natural)
- Needle tool
- One basic trimming tool
That's it. Seriously. With these five tools, you can do almost everything in pottery.
Nice additions when budget allows ($20-30 more):
- Fettling knife
- Second trimming tool in different size
- Set of basic modeling tools
- Metal rib
Even with the "nice additions," you're looking at $50-70 total if you buy individually. But honestly, the affordable kits are such good value that buying individual tools only makes sense if you have very specific preferences or already own some tools.
Caring for Your Pottery Tools
Pottery tools don't require much maintenance, but basic care extends their life:
Clean them after use: Dried clay is surprisingly hard on tools. Wipe or rinse them clean before clay dries completely. I keep a bucket of water at my pottery station for cleaning tools as I work.
Dry wooden tools thoroughly: Wood can crack or warp if left wet. Dry wooden handles and ribs before storing them.
Check wire tools regularly: The wire can weaken with use. Replace cut-off wires before they break mid-use (usually very annoying timing).
Store tools properly: I keep mine in a fancy Soolla bag that my husband bought me as a thoughtful gift. They are perfect for potters and have lots of nooks and crannies to store your tools. However, they are not necessary and a simple pencil case or small tool bag or box works fine.
Sharpen metal tools occasionally: Trimming tools can get dull with use. A simple sharpening stone maintains their edge. Though honestly, I've been using the same trimming tools for eighteen months without sharpening them, so this isn't urgent maintenance.
Pottery Tools for Different Techniques
Depending on which pottery techniques you focus on, your tool needs vary slightly:
Wheel throwing focus:
- Wire tool (essential)
- Ribs (essential)
- Sponge (essential)
- Trimming tools (essential)
- Needle tool (very useful)
Hand building focus:
- Wire tool (useful for cutting clay)
- Rolling pin or slab roller (or just a rolling pin from your kitchen)
- Ribs (useful for smoothing)
- Fettling knife or butter knife
- Needle tool for scoring and detail work
Sculpture focus:
- Modeling tools become more important
- Wire tool for cutting
- Various ribs and scrapers
- Texture tools (or improvised alternatives)
Notice how the wire tool, ribs, and needle tool appear on every list? That's because they're genuinely versatile and useful across all pottery techniques.
Where to Buy Pottery Tools
You have several options for purchasing pottery tools:
Pottery supply stores: Physical stores let you handle tools before buying, which is valuable. Staff can offer advice. Prices are usually reasonable, though not the cheapest.
Online pottery suppliers: Companies like Clay Art Center, Sheffield Pottery, and others offer huge selection and often better prices. Shipping can add cost, so buy multiple items at once.
Amazon and general retailers: Sometimes cheaper, but quality can be inconsistent. Read reviews carefully. Good for basic tools, questionable for specialized ones.
Your pottery studio: Many studios sell basic tools at reasonable prices. Convenient, and you know the quality matches what you're using in class.
Used pottery tools: Check eBay, Craigslist, or pottery guild sales for used tools. Metal and wooden tools last forever if cared for. This is how I got several of my specialty tools at fraction of retail cost.
The Tools I Actually Use Most
After eighteen months of regular pottery practice, here are the tools I reach for every single session:
1. Wire cut-off tool – multiple times per session
2. Wooden rib – constantly, for smoothing and shaping
3. Sponge – essential for wheel throwing
4. One favorite trimming tool – I have eight, use one primarily
5. Needle tool – for trimming rims and poking holes
Notice anything? That's the exact "essential" list I recommended at the beginning. All those other tools I own? Used occasionally, sometimes not for months.
I also regularly use:
- Credit cards for smoothing
- Kitchen knife for cutting slabs
- Fork for scoring
- Chopsticks for various tasks
None of those cost me anything extra, and they work perfectly well alongside my "proper" pottery tools.
My Advice After Making Tool-Buying Mistakes
If I could go back and advise my beginner self about pottery tools, here's what I'd say:
Wait longer than you think. I bought tools way too early. Using studio tools for six months would have given me much better perspective on what I actually needed.
Start minimal. Even my "essential" list might be more than you need initially. Buy tools one at a time as specific needs arise.
Affordable kits are great, expensive ones aren't. A basic $15-30 tool kit that includes the essentials is a smart purchase. Avoid the $50-100+ sets that include specialty tools you'll never touch.
Try before you buy. If your studio has a tool available, use it several times before buying your own. You might discover you don't like that particular tool as much as you expected.
Quality matters, but not as much as you think. Basic pottery tools are simple objects. There's not a huge difference between a $5 wooden rib and a $15 one. Save money for clay and firing fees instead.
Improvise creatively. Some of my favorite "tools" came from the kitchen or hardware store. Don't assume you need specialized pottery tools for everything.
Finding Pottery Classes to Learn Proper Tool Use
The best way to learn which pottery tools you need and how to use them effectively is through hands-on instruction. Pottery classes teach not just techniques but also proper tool usage.
A good pottery instructor will demonstrate how to use each tool effectively, explain why certain tools work better for specific tasks, and help you develop good habits from the beginning.
Find pottery classes near you: Check out FindAPotteryClass.com to discover pottery studios offering beginner classes where you can learn proper pottery tool techniques before investing in your own toolkit. Filter by class type and read reviews to find studios with experienced instructors who focus on fundamentals.
The Bottom Line on Pottery Tools
Pottery doesn't have to be an expensive hobby, at least not when it comes to tools. The basics are simple, affordable, and sufficient for everything from beginner bowls to advanced pottery techniques.
Don't let lack of tools stop you from starting pottery. Studios provide everything you need for classes. When you're ready to build your own collection, start small and add tools gradually based on your actual practice, not what looks interesting in catalogs.
The most important tools for pottery aren't physical objects anyway – they're patience, practice, and persistence. Those don't cost anything, and they're far more valuable than any fancy tool set.
Your hands are your primary pottery tools. Everything else is just there to support what your hands are doing. Keep that perspective, and you'll avoid wasting money on tools that end up unused in the bottom of your bag.
Now stop browsing pottery tool catalogs and go make some pottery with whatever tools are available. That's the best way to learn what you actually need.